User manual for Veritas Bevel-Up Planes
Veritas® flat angle planes are versatile and easy-to-use planes. The design with the bevel of the iron facing upwards allows you to change the cutting angle as needed by altering the bevel angle of the iron. A small cutting angle of 38° (12° bed angle with 25° bevel) reduces tear-out in end grain. Larger cutting angles (about 50° when using an iron with a 38° bevel angle) are suitable for smoothing (finishing). The flat angle planes all have an adjustable mouth that can be closed down to a narrow slot to take fine shavings with minimal tear-out, but can also be opened wide for coarser cuts. The adjustment can be made quickly and precisely with the help of the locking knob and the unique adjustment screw. The irons are finely ground and are available in both A2 steel with a hardness of 60 – 62 HRC and O1 steel with a hardness of 58 – 60 HRC.
By using sandpaper, the surface of the sharpening stone becomes clogged with particles from the sandpaper, causing blades to merely glide over the sharpening surface and the stone does not grip.
If it cannot be avoided to expose the sharpening stone to the aforementioned unfavorable conditions such as 2 (outdoors, in direct sunlight), 3 (in a place with direct wind), and 4 (at extremely high temperatures), store the sharpening stone in its plastic box.
If you sharpen your blades step by step with several sharpening stones of different grits (i.e., first with a coarse sharpening stone, and then with a finer one), carefully rinse off the dirt from your hands and blades after each working process. Remaining coarse grains can cause scratches on your blades.
Setting the iron
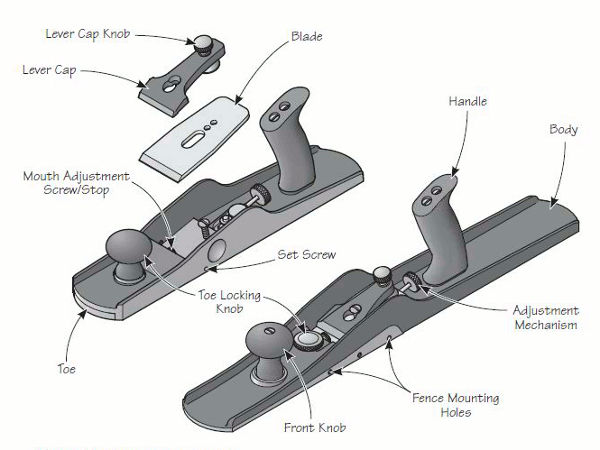
Figure 1: Parts of the Plane
Lever Cap Knob = Knurled screw of the cap
Lever Cap = Cap
Blade = Blade
Handle = Handle
Body = Plane body
Mouth Adjustment Screw/Stop = Mouth width limit screw
Set Screw = Limit screw
Toe Locking Knob = Locking screw
Adjustment Mechanism = Adjustment mechanism
Front Knob = (front) knob
Fence Mounting Holes = Holes for mounting a fence
Play (in the adjustment mechanism) and how to avoid it
Attention: Remember that the blade is very sharp. Careless handling can lead to serious injuries.
To set the blade for the first time, open the mouth as wide as possible and place the plane on a flat wooden surface (e.g., a scrap piece, preferably softwood). Lightly clamp the blade using the knurled screw of the flap (so that it does not slip by itself) and adjust it by turning the adjustment screw until it just touches the wood.
Turn the plane over and align along the sole to ensure that the cutting edge is parallel to the sole. If necessary, adjust the blade slightly more or retract it a bit. Clamp the blade firmly (a quarter turn on the knurled screw of the flap should suffice – do not clamp the blade too tightly) and make a test cut. If everything fits, tighten the two side limit screws just enough so that they barely touch the blade. This is not meant to clamp the blade but to provide guidance that prevents the blade from shifting sideways in the mouth. From now on, any lateral adjustment will only be made by moving the adjustment mechanism. This is a significant advantage over other designs, which either have a tightly milled recess at the front and thus no possibility for lateral adjustment, leading to the need to sharpen the blade at an exact 90° angle to the sides, or provide enough space for the blade to move sideways, which means that every time you change the cutting depth, you also have to correct the lateral adjustment.
You will quickly get used to setting the cutting depths by aligning along the plane sole. However, for very fine shavings, test cuts are necessary in any case.
Two warnings:
- The knurled screw of the flap has a tremendous leverage. For normal use, it is sufficient to tighten it just a quarter turn after the blade has fully touched. Never tighten it as hard as you can, as you could damage the plane.
- Check the mouth opening every time before you adjust the blade to ensure that you do not push the blade against the adjustable front piece. It is very easy to set the mouth as tight as you need after you have set the cutting depth. In any case, it is better for the blade to become dull while planing than while adjusting!
Adjustment of the plane mouth

Sharpening the iron
The mouth width limiting screw allows you to set the size of the mouth precisely. Once you have set the mouth width limiting screw, it also prevents you from accidentally pushing the front piece back too far, so that it touches the iron and possibly gets damaged. To adjust the mouth width, first loosen the locking knob (front handle or knurled screw – depending on the model). Then hold the plane upright (vertically) and adjust the position of the front piece by turning the mouth width limiting screw in or out as needed. Once you have reached the desired mouth width, tighten the locking knob firmly, but not too tightly.
Figure 2: Adjustment of the plane mouth
Toe = Front piece
Mouth = (plane) mouth
Toe Locking Knob = Locking knob (this is either the front handle or a knurled screw depending on the model)
Mouth Adjustment Screw/Stop = Mouth width limiting screw

Cleaning (Smoothing) with high cutting angles
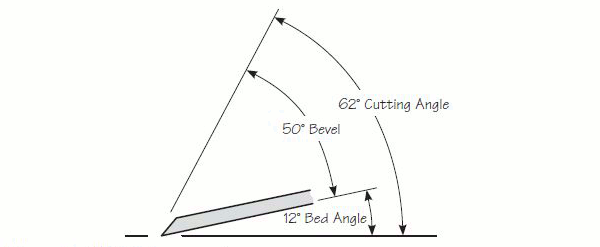
Figure 3: 25° Cutting Geometry
Bevel = 25° bevel angle (wedge angle)
Cutting Angle = cutting angle
Bed Angle = angle of the plane bed
It is difficult to make general statements about the bevel angle. Some people never hold the plane at an angle to the cutting direction while planing. Others always do this. If you usually hold the plane at an angle, then you can use lower bevel angles. If you only work with knot-free pine wood, you can even use very low bevel angles. Only you know which wood you are working with and how. Experience will show you what works and what doesn't.
 with high cutting angles")
The iron with a bevel angle of 38° results in a cutting angle of 50° (commonly referred to in English as "York Pitch") and is therefore an excellent iron for general smoothing. Higher cutting angles require more force to push the plane forward. This makes the iron with a bevel angle of 38° an ideal starting point (in terms of the relationship between work result and effort) when working with difficult wood.
Planing end grain wood
Note: You can easily turn a 25° iron into an iron with a higher bevel angle by grinding a suitable microbevel. The reverse is, however, significantly more difficult, as much more material needs to be removed (ground down). If you plan to use your plane for various purposes, it makes sense to have several irons with different bevel angles. This gives you the ability to quickly change the cutting angle without having to re-grind the iron beforehand. You can grind the iron as you are used to with all other plane irons. Using a sharpening guide will greatly assist you in accurately maintaining the angles for the bevel and microbevel.

Care and Maintenance
- Keep the blade as sharp as possible.
- Make fine cuts (small chip thickness).
- Choose the bevel angle of the iron as low as possible while ensuring the stability of the edge. This certainly requires some experimentation. Start with a small bevel angle and only increase it if there are edge blowouts. The blowouts quickly become noticeable through corresponding marks (grooves) on the end grain.
- Hold the plane at an angle. Instead of planing straight across the end grain, hold the plane at an angle to the cutting direction. This has the same effect as reducing the bevel angle, as it reduces the cutting angle. If your plane has a cutting angle of 37° and you hold it at a 45° angle to the cutting direction, you will have the same cutting behavior as if you had reduced the cutting angle of the plane to 28°. If you were to hold the plane even more at an angle – about 60°, you would achieve a cutting angle of 21°. (This behavior is vividly described in Leonard Lee's book: The Complete Guide to Sharpening). There are no edge blowouts because the same shear force acts on a wider piece of the edge. This leads directly to one of the lesser-known facts about tool technology: An iron that is used at an angle can be sharpened with a smaller bevel angle than an iron that is guided straight over the wood. The edge of the angled iron remains stable and will not blow out.
Planing end grain requires a lot of force. Therefore, it is essential that the workpiece is securely clamped. If possible, clamp the workpiece upright in a vise so that it is low enough for you to work safely and comfortably. You can prevent the edge of the workpiece from tearing out by clamping a small scrap piece as a chip block to the edge.
Figure 6: Preventing tear-out when planing end grain Workpiece = Workpiece
Scrap Block = Chip Block