February 4, 2025
Instructions - how to use our Tools
User manual for the Veritas Mini-Chisel Cutter
The Veritas Mini-Dowel Cutter is specifically designed for dowels on small workpieces - ideal for chair rungs, lattice work, toys, and small rustic furniture. The dowel shoulder is cut at a 60° angle. Due to its small size, a small drill can be used even with low torque. A blade setting gauge makes it easier to set the blade to the desired dowel thickness. This blade is easy to sharpen.
The Veritas dowel cutters are built for hand drills and should never be used in a bench or pillar drill. Reasons:
- The workpiece must be precisely clamped in the axis of the drill chuck. Any small deviation creates a high imbalance on the dowel cutter, which can damage its shank.
- One does not have a feel for how well or poorly the dowel cutter is working on the bench drill. There is a risk that it will be overstrained without one noticing. This can lead to damage to the shank.
- Excessive strain at high speed can lead to overheating of the carbon steel blade, causing it to lose its hardness.
Test Cut
Clamp the dowel cutter in a drill.
Clamp a piece of wood horizontally in a vise at about waist height. The piece of wood should not be larger than specified in the table for the respective dowel cutter size.
| Maximum wood diameter of the raw material for dowel cutter diameter | |
|---|---|
| Dowel diameter (end product) |
Max. diameter of the wood (raw material) |
| 1/4 in. (6.3 mm) | 3/4 in. (19 mm) |
| 5/16 in. (7.9 mm) | 3/4 in. (19 mm) |
| 3/8 in. (9.5 mm) | 7/8 in. (22.2 mm) |
| 7/16 in. (11.1 mm) | 7/8 in. (22.2 mm) |
| 1/2 in. (12.7 mm) | 1 in. (25.4 mm) |
Note: If you do not have a vise, you can also secure the workpiece on a flat work surface with clamps.
Position the drill with the dowel cutter on the workpiece and align it in height and side to side by eye, so that it is exactly in line with the workpiece. It is important to recognize that this dowel cutter cuts the dowels exactly in the axis of the drill. If you want off-center or angled dowels, clamp the workpiece at an appropriate angle.
Note: No matter what type of dowel you are making: keep the drill stable in the same direction during a cutting pass. Do not wobble!
Once you have aligned the drill with the clamped dowel cutter, turn it on. Work at a medium speed of about 800 - 1000 rpm. If the machine runs too fast, there is a high risk that the dowel will not be straight. During rotation, long and even shavings should come out. If no shavings come out, the blade needs to be adjusted.
Note: The shank of the dowel cutter is drilled through. This allows you to easily remove broken dowels using a pin punch (up to D = 4 mm).
Blade Adjustment
A brass blade setting gauge is included to simplify the blade adjustment.
The bodies of the Veritas low-angle planes are made from ductile cast iron and are equipped with rust protection upon delivery. Remove the rust protection with a cloth dampened with white spirit. Clean all machined surfaces, including the front piece and the entire front area of the plane.
We recommend that you apply a fine layer of soft wax to the sole at the beginning and then regularly as a sealant to prevent moisture ingress and rust. This also has the advantage of serving as a lubricant for a smoother cut. To do this, remove all wood dust from the relevant surfaces, apply some wax, let it dry, and polish it with a clean soft cloth. At the same time, the solvents in the wax remove all harmful contaminants from your fingers that could lead to corrosion. This is especially important for planes that are handled on the ground surfaces, such as when you use them to register miters in the miter box.
Please remember that some waxes contain silicones, which can cause problems with surface treatment if they come into contact with the workpiece. Please use silicone-free products or a surface sealant for tools to avoid these issues. Both are excellent alternatives to conventional waxes. In any case, before applying a sealant, remove all fingerprints with a cloth dampened with a little light machine oil. Remove any remaining oil before applying the sealant to the sole and sides of the plane.
If the storage conditions are damp or humid, you should wrap your plane in a cloth or store it in a plane storage bag in addition to the treatment described above. This precaution also protects against dents and scratches.
Occasionally disassemble the plane to clean it and lubricate where necessary. Remove the cap, the iron, the adjustment mechanism, and the front piece from the plane body. Clean all parts with a cloth dampened with a little light machine oil. A little oil benefits the plane bed, the contact surfaces between the plane body and the front piece, as well as the adjustment mechanism (the axle, the thread, and the follower) to function smoothly. If rust does occur on the plane body, we recommend first removing it with a fine rust eraser and then proceeding as described above.
The shiny surface of the brass parts can be maintained as described above. If you prefer a patina on the brass, simply leave the brass parts unprotected until the desired degree of oxidation is reached. Then apply a sealant. If you want them shiny and bright again, simply revive the surface with a brass polish.
The handles made of Bubinga (African rosewood) are lacquered and require nothing more than occasional cleaning with a clean cloth.
Setting the tenon diameter:
1. Read the operating instructions! Learn about the applications and limitations of the tool, as well as the dangers it poses.
2. Do not turn off your common sense. If an application seems unsafe to you, it probably is.
3. Wear appropriate eye and/or ear protection. Regular glasses do not have safety glass. If dust is generated during work, use a dust mask. Workshop visitors should wear the same protection as the tool user.
4. Wear suitable, close-fitting clothing. Clothing with wide sleeves is not suitable. Do not wear loose gloves, ties, or jewelry while working, as these can be caught by a rotating tool. Long hair should be tied back.
6. Do not work under the influence of alcohol, drugs, medication, or when you are fatigued.
7. Ensure a suitable environment for your work. Electric tools should only be used in a dry, clean, and well-lit environment, and never near flammable liquids or gases.
8. Observe the regulations for electrical installations in your country.
9. Protect the cable of your electric machine from heat, oil, or sharp edges.
10. Never carry a plugged-in electric tool with your finger on the switch.
11. Never carry an electric tool by the cable.
12. Always use the appropriate tool. Never use a small machine or tool for heavy and large work for which it is not suitable.
13. Do not force the tool. Less pressure is often better.
14. Do not use damaged tools. They can be dangerous.
15. Repairs and maintenance should only be performed by an authorized service provider using original spare parts.
16. Do not modify the tool. If you notice abnormal behavior during use, stop working.
17. Keep your tool in good condition. Keep your tool sharp, clean, and lubricated where necessary. Sharp edges have less risk of kickback and are less likely to burn the workpiece surface. They cut faster, cleaner, and safer than dull edges.
18. Keep hands away from the rotating tool.
19. Unplug the tool before changing or adjusting tools or when cleaning the machine. 20. Handle tools with sharp edges carefully.
21. Always insert the shank of a tool as deeply as possible into the holder to ensure a secure grip. Tighten the tool well.
22. Remove all nails from the workpiece before working on it.
23. Always secure the workpiece well in a vice or other suitable holding device. 24. Ensure that all settings are correct before starting work.
25. Remove wrenches or chuck keys before starting work.
26. Never remove a workpiece or sections from a running machine.
27. Only turn away from the machine once it has completely come to a stop.
28. Electric tools should be stored dry and locked away, so they are out of reach of children.

Setting the chip thickness:
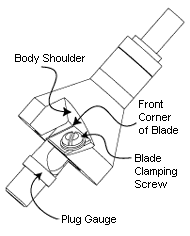
Loosen the clamping screw only enough to adjust the knife with minimal vertical play. Insert the knife setting gauge into the hole of the mortising cutter body and turn it until the round surface points to the cutting edge of the knife. Carefully bring the knife close to the gauge so that the right corner of the edge lightly touches the knife setting gauge. The right side (edge) of the knife must rest against the shoulder of the mortising cutter body. Then, tighten the clamping screw again.
Now rotate the knife setting gauge so that the flat surface faces the knife and no longer touches it, and then pull the gauge out. Make a test cut and measure the tenon. If it does not cut as it should, try again and read under: Problems and their solutions.
Now rotate the knife setting gauge so that the flat surface faces the knife and no longer touches it, and then pull the gauge out. Make a test cut and measure the tenon. If it does not cut as it should, try again and read under: Problems and their solutions.

Tenon length
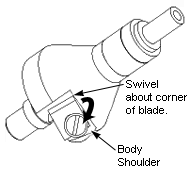
The knife can be adjusted to produce thicker shavings. Repeat the adjustment of the tenon diameter described above, but: after loosening the clamping screw, turn the iron to the left, moving the rear edge away from the shoulder (body shoulder) of the tenon cutter body. The front right corner of the blade remains in the same contact with the setting gauge as before.
Note: The knife setting gauge is made of soft brass so that it cannot damage the cutting edge upon contact. However, this has the opposite effect that small scratches gradually appear in the gauge, which cannot be avoided. But since this gauge is quite long, you will still find areas that are unscratched even after frequent use.
Only approach the knife to the knife setting gauge very carefully to avoid deep scratches. If the edge of the knife is pressed into the gauge, it may break.
Sharpening:
The 1/4, 5/16, and 3/8 inch dowel cutters cut dowels with a length of 1 inch (25.4 mm).
The 7/16 and 1/2 inch dowel cutters cut dowels with a length of 1-3/8 inch (34.9 mm).
Shorter dowels are created by stopping the cut before reaching the bottom.
The 7/16 and 1/2 inch dowel cutters cut dowels with a length of 1-3/8 inch (34.9 mm).
Shorter dowels are created by stopping the cut before reaching the bottom.

Problems and their solutions
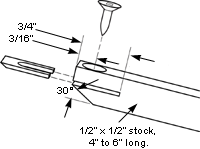
A small knife is best sharpened with a homemade knife holder made from a strip, 13 x 13 mm, 100 to 150 mm long. Saw a slot 13 mm deep into one end and drill a hole vertically into the slot deep enough to reach the slot. You can now clamp the knife securely with a screw. Bevel the wood underside under the slot.
Sharpen on a flat sharpening stone; a Japanese combination stone with grits of 1000 and 6000 is perfectly sufficient. After sharpening, the burr on the 6000 side of the combination stone should be removed.
Sharpen on a flat sharpening stone; a Japanese combination stone with grits of 1000 and 6000 is perfectly sufficient. After sharpening, the burr on the 6000 side of the combination stone should be removed.

