User manual for MIYANAGA Poly-Clic carbide hole saws
- These hole saws can be operated freehand with a strong drill using a pilot drill or guide pin. High torque can generate significant forces. Therefore, ensure a stable stance.
- Wear eye protection to prevent flying debris or chips from hitting your eyes.
- Hold the hole saw body firmly when removing it, as it may be ejected by the plug.
- Be aware that shortly after drilling, both the workpiece, debris, and the drill bit can be very hot and may burn your hand upon contact.
- Never use the drill in hammer mode, only in rotation mode.
- The holder for the pilot drill should be lubricated occasionally.
- Do not turn off the drill while drilling. The drill bit may get stuck.
- Unplug the power cord for tool changes.
Special Notes for Poly-Clic Galvawood Hole Saws
- Maximum drilling depth 130 mm in one go. Suitable for wood, plywood, particle board, MDF, polyvinyl pipes, fiberglass-reinforced plastics, composite materials.
- Not suitable for composite materials where the metal plates are thicker than 1 mm. (Use hole saw No. 378 - upon request)
- If the drill gets stuck while drilling in wood and does not continue to turn, pull the hole saw back. Then remove the pilot drill and continue drilling without it.
- Not suitable for hard ceramics or fine stoneware. (Use Poly-Clic Hyperdia hole saws for this - upon request)
| Recommended RPM for Galvawood Hole Saws | |
|---|---|
| Drill Size | min-1 |
| 25 - 45 mm | 800 - 1500 |
| 50 - 80 | 700 - 1100 |
| 85 - 220 | 500 - 1100 |
Special Notes for Poly-Clic Wooding Hole Saws
- Maximum drilling depth 60 mm in one operation, max. 130 mm in multiple operations. Suitable for wood, plywood, particle board, MDF, polyvinyl pipes, drywall, fiberglass-reinforced plastics, and various composite materials with metal or ceramic coatings.
- Not suitable for hard ceramics or fine stoneware. (Use Poly-Clic Hyperdia hole saws for this - upon request)
- Not suitable for aerated concrete (Use Poly-Clic ALC hole saws for this - upon request)
- Not suitable for metal coatings thicker than 0.5 mm (Use Poly-Clic Hybrid hole saws for this - upon request)
| Recommended RPM for Wooding Hole Saws | |
|---|---|
| Drill Size | min-1 |
| 25 - 45 mm | 800 - 1500 |
| 50 - 120 | 700 - 1100 |
| 130 - 220 | 500 - 1100 |
Usage
- Insert the holder into the drill chuck.
- Now insert the pilot drill into the holder (details below).
- Drill a pilot hole in the material before mounting the hole saw body. This prevents the hole saw body from suddenly striking the surface of the material when the pilot drill breaks through.
- Now mount the hole saw body (details below).
- Slide the guide plate over the pilot drill until it is positioned just behind the teeth of the hole saw.
Note: This only applies to long hole saws; short hole saws do not have a guide plate. - Initially drill slowly and with little pressure until the hole saw stabilizes itself by immersing into the material.
- When the hole is finished, pull the hole saw back while it is still rotating.
- If the core gets stuck, remove the hole saw from the shank. You will then have access from the side opposite the teeth and can push the core out towards the teeth with a rod.
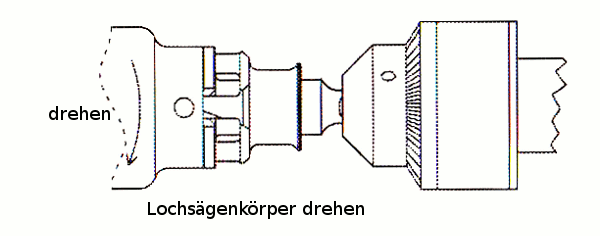
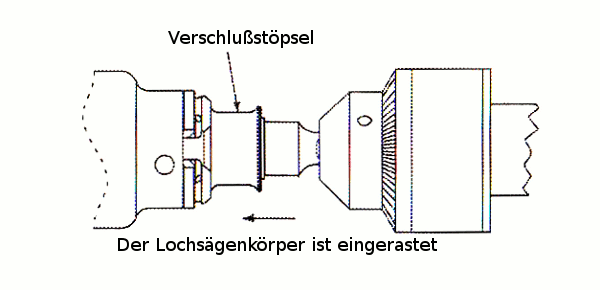
Attaching the hole saw body to the holder
- Wear safety goggles!
- Remove jewelry, secure long hair
- Do not wear gloves - they can get caught in possibly rotating workpieces
- Secure the workpiece firmly, e.g., with a machine vice
- Do not leave the drill chuck key in the chuck
- Use a drill stand or bench drill wherever possible

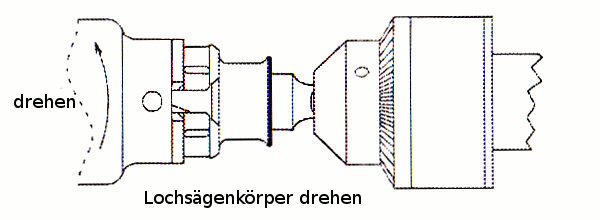
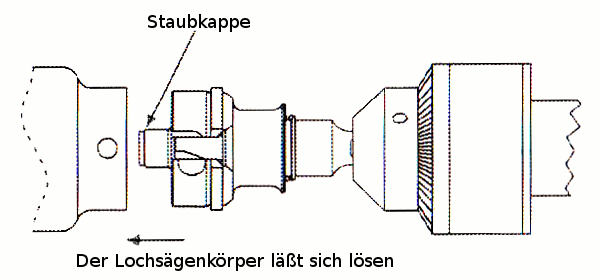
Separation of the hole saw body from the holder

Attaching the pilot drill or guide pin to the holder

Separation of the pilot drill or guide pin from the holder

Function of dust cap and rubber sleeve


Related products

Available, delivery time: 1-3 businessdays within Germany

Available, delivery time: 1-3 businessdays within Germany

Available in 14 days, delivery time 1-3 businessdays within Germany

Available, delivery time: 1-3 businessdays within Germany

Available, delivery time: 1-3 businessdays within Germany

Available, delivery time: 1-3 businessdays within Germany

Available, delivery time: 1-3 businessdays within Germany

Available, delivery time: 1-3 businessdays within Germany

Available, delivery time: 1-3 businessdays within Germany