Sharpening of card scrapers
What are card scraper used for?
Observe the edge closely in good light - if you notice the slightest reflection, the edge is dull (do you remember the zero-radius story? The radius reflects the light. Without a radius, there is no reflection.)
If you have just sharpened a chisel, the iron of a block plane, or a smoothing plane without a chipbreaker, you are done with the work. But if you have worked on an iron with a chipbreaker, you are only finished when you have also sharpened and honed it. When the chipbreaker is attached to the iron, it must lie so closely against the iron across its entire width that there is no possibility for shavings to get between them! Therefore, hone the part of the iron just behind the edge before the curve. Do not use a coarser grit than absolutely necessary. How fine it ultimately needs to be is a matter of experience. Since chipbreakers are usually not hardened, the work goes relatively quickly. It is important that the grooves from the previous sharpening process are completely removed by the subsequent one and that the surface of the chipbreaker resting on the iron is smooth and flat. Now you are done with the work!
Repeat the sharpening as often as possible, do not use a coarser stone than absolutely necessary. Sharpening more often saves time and keeps your iron always ready. Now good luck and have fun working!
Ron Hock
Hock handmade Knives
www.hocktools.com
© 1998
Ron Hock is the manufacturer of excellent plane irons made from fine-grained carbon steel with a hardness of 62 HRC. You can purchase these plane irons from us.

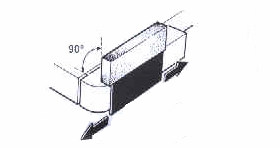
The preparation of the card scraper
To achieve an accurate right angle, there are various methods:

- Two rectangular strips are clamped almost flush with the edge of the scraper blade using 2 small clamps, so that the file cannot tilt and just barely engages with the metal. Of course, it is not entirely avoidable that wood is also filed.
- Use the VERITAS jointing guide; with the clamped flat file, you will achieve an exact right angle. See sketch! You can find a jointing guide in our online shop.
The tightening of the edge
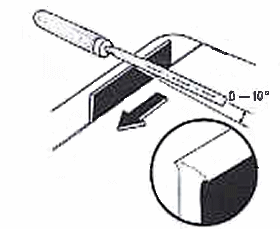
Scraping and scratching can already be done with the properly sharpened card scraper. But you will only achieve a fine shaving if a burr is raised. In the past, a ground triangular file was used, which obviously had the right hardness for this. Today, there are triangular or round card scraper steels for this purpose. Which is better cannot be said easily; preferences depend more on habits. In Germany, the triangular steel is the most common, while in the Anglo-Saxon world, the round card scraper steel has prevailed. Such a steel must in any case be significantly harder than the material of the card scraper. Swan-neck card scrapers and convex-concave shapes can only be worked with the burnisher.
Before raising the burr, the grinding dust should be removed. Oil the
card scraper
and the burnisher! There are various methods for raising the burr:
A. Place the blade on the workbench so that the side with the burr to be raised is facing forward and hold it firmly with your left hand. In your right hand, with the handle down (steel on top), hold the burnisher and start pulling the burnisher towards you, pressing it against the far end of the
card scraper
. Place the tip of the steel at this far end and as you raise the burr, move the steel higher. Try to stay as perpendicular as possible to the blade edge! In this way, you will stroke diagonally across the
card scraper
edge and prevent grooves from forming in the burnisher. You can repeat this raising - but always only in the same direction. For a coarser burr, you only need to angle the burnisher slightly so that you come just under 90°.
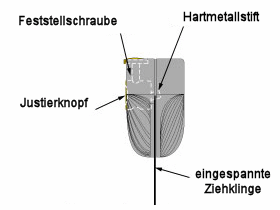
C. Use the Veritas burnisher sharpening device! It has the advantage, especially for beginners, that the initially very difficult handling of the burnisher, which requires practice, is eliminated. However, you can only use this sharpening device for rectangular blades, not for swan-neck burnisher blades.
In the sketch on the right, you can see a cross-section. The burnisher sharpening device is pulled over the burnisher blade, which is clamped vertically in a vise or on the workbench. The white dashed line indicates the internal structure of this device. A carbide pin serves to attract the burr. On the left, you can select the desired angle for the burr with the adjustment knob. After the angle is chosen, the set angle is fixed with the locking screw, and then the sharpening device is pulled over the burnisher blade one or more times until the desired burr is achieved. With this device, you have a safe and reliable guide. It is available on our burnisher page.
This is how the device is used:

Working with the card scraper
1. Clamp the card scraper in the vise.
2. Apply a little oil to the edge of the card scraper .
3. With the angle set to 0°, pull the tool with moderate pressure two or three times over the edge of the card scraper . This process will slightly widen the edge of the card scraper and prepare it for the next step.
4. Now select the angle you want on the tool. You will find the ideal angle for you only through experience. Now, pull the burr in the same way as in the previous step.

4 important factors
You can quickly determine if you have sharpened correctly. If only dust is produced on hardwood, such as beech, the edge is dull. The card scraper must remove fine shavings. The blade is guided with a pulling cut - in almost vertical position - over the surface to be worked on. Hold it firmly with both hands and press the blade slightly hollow with your thumbs. The stronger the deflection, the greater the material removal. If the blade must be held very obliquely to even grip, the edge has been sharpened at the wrong angle. Here are some tips for everyday use:
- Work with the grain of the wood, not against or across it, otherwise you will only get rough surfaces.
- If staining is to be done afterwards, the previously planed surface must be wetted and fine sanded after drying (grain 220 and up). When working with the card scraper , wood fibers can be pressed down, which then stand up again when wetted. Sanding removes the upright wood fibers.
- Use card scrapers of different thicknesses. Over time, you will find out for yourself which thickness works best for which tasks. As a rule of thumb: the thinner the blade, the finer the work, and vice versa.
- Always have several blades ready for sharpening as well as for a work project. It saves preparation time, and it is annoying to constantly interrupt an ongoing task due to necessary sharpening work.
- Store the card scrapers in such a way that the edges do not come into contact with other metals. A wooden block with approximately 1 cm deep saw cuts, into which the blades are inserted, has proven effective.
- If the card scraper has become dull, the edge can be renewed several times with the burnisher or the card scraper edge sharpener. The burnisher must always be held at a steeper angle - which also applies to working with the card scraper .
- If you are no longer successful with the above method, you must start over, i.e., remove the old edge with a file.
Ease of work through card scraper holder
1. Thickness of the burr
2. Angle of the burr
3. Bending of the card scraper during work
4. Clean filing and sanding work before drawing the burr.


Important: Only adjust the deflection with the locking screws loosened!
To insert the card scraper , turn the screw of the pressure block in the middle of the holder all the way back. Then loosen the two outer knurled screws made of brass and tap the screw heads with your fingertip. A conical retaining pin will release and create a gap into which the card scraper can be inserted.
After you have inserted the
card scraper
, lightly tighten the knurled screws so that the blade is still movable. Now set the middle pressure screw to the desired deflection. Only now do you tighten the two outer knurled screws firmly. It is up to you whether you push the
card scraper
all the way in or only partially. This gives you additional variability while working.
VERITAS recommends that after finishing your work, you loosen the two locking screws and turn the pressure block back for the deflection.
And now I wish you much success in your work!
Related products

Available, delivery time: 1-3 businessdays within Germany

Available, delivery time: 1-3 businessdays within Germany

Available, delivery time: 1-3 businessdays within Germany

Available, delivery time: 1-3 businessdays within Germany

Available, delivery time: 1-3 businessdays within Germany

Available, delivery time: 1-3 businessdays within Germany

Available, delivery time: 1-3 businessdays within Germany

Available, delivery time: 1-3 businessdays within Germany

Available, delivery time: 1-3 businessdays within Germany

Available, delivery time: 1-3 businessdays within Germany
 VERITAS")
Available, delivery time: 1-3 businessdays within Germany

Available, delivery time: 1-3 businessdays within Germany

Available, delivery time: 1-3 businessdays within Germany

Available, delivery time: 1-3 businessdays within Germany

Available, delivery time: 1-3 businessdays within Germany

Available, delivery time: 1-3 businessdays within Germany