Adjustment and use of the Veritas scraper plane
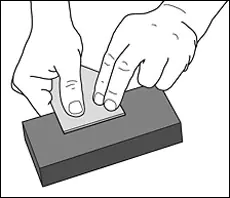
Final leveling and smoothing of large, flat surfaces before applying oil or varnish - that is the task of the drawknife plane. Since it is constructed similarly to a bench plane, it can be used just as comfortably, and the large sole ensures that the surface of the workpiece becomes truly smooth.
The drawknife plane does not replace the smoothing plane but is used after it. The surface should therefore already be in good condition, flat, or nearly so, as it should be with a smoothing plane. In contrast, the drawknife plane replaces sanding, which is the process before applying the finish (that skilled users can achieve the final finish with the smoothing plane will not be discussed here - it is possible but significantly more difficult). Sandpaper tears the wood fibers, while the drawknife plane cuts them. The result is as follows: The drawknife plane brings out the wood grain, while sandpaper dampens the lively expression of the wood.
This plane is equipped with a 73 mm wide and 1.4 mm thick blade made of carbon steel. The bevel has a sharpening angle of 45°. The pleasant thing about the drawknife plane is that you can variably adjust both the bedding angle of the blade and also slightly flex it in the cutting area to achieve the best result. The bedding angle of the blade is variable from vertical to 25° forward. The more you tilt it forward, the deeper the blade penetrates the wood. You can extend the service life (the time between two sharpening sessions) by increasing the forward tilt of the blade. When the blade is flexed in the cutting area, you have an additional fine-tuning of the cutting depth. Furthermore, this prevents the edges of the blade from leaving unsightly grooves in the workpiece. The latter is accomplished with the knurled screw, which is labeled "Blade Bow Thumbscrew" in the image below.
As an accessory, there is also a 3.2 mm thick blade made of A2 steel, which does not flex and is particularly suitable for extremely wild wood.

Working with the drawknife plane

Sharpening the blade
At first glance, a pull plane seems like a somewhat strange tool, and many woodworkers, even those with years of experience, are not familiar with it. Why should one even use such a device? And why is the iron clamped at such a strange angle?
A closer look reveals the answer. The cutting geometry of the raised edge (the curve at the cutting edge) is not much different from the cutting geometry of a bench plane with a properly set chip breaker. (Image left)
The raised edge on the pull plane iron works like a plane, but like one that has a significantly higher cutting angle than a normal plane, so instead of 45°, for example, 60°. This means that the shavings immediately after the cutting edge roll or curl abruptly, or break, which is something that a normal plane only achieves with the chip breaker. This effectively prevents the breakout of fibers in front of the cutting edge of the plane, and therefore a pull plane is also suitable for very difficult-to-plane wild wood.

Sharpening the blade of a drawknife plane is the most difficult part of learning to use it. Only when you understand how a drawknife works and what a sharpened edge on the blade should look like (see image above), should you attempt to sharpen such a blade.
The bevel of the drawknife plane has an angle of 45°. This distinguishes this blade from freehand drawknives or veneer planing blades, which are ground at a right angle. The advantage of the 45° grind is that it is much easier to create an edge that cuts quite aggressively.
The edge should have an angle of about 15°. At 20°, there is already a risk that the iron will scratch too much and cut less. You can tell this by the fact that your drawknife plane produces dust instead of shavings. Additionally, at this angle, the iron may vibrate. Conversely, too low an angle may mean that the plane just skids over the wood surface without cutting.
For a new blade, you can skip this step. It is important that the bevel of the blade is exactly 45° and straight. To accurately shape this bevel, clamp the blade in a vise and use a 150 or 200 mm long file. Check the result with a hairline ruler or a protractor and make corrections if necessary. It is very easy with the Veritas Jointer/Edger.
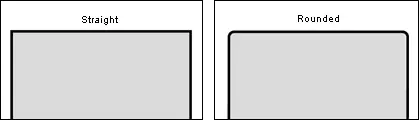
Start with a Japanese water stone with a grit of 800 or 1000 to remove the grooves from the file. Move the blade over the stone in such a way that its entire surface touches the stone until the grooves from the file are gone. Check the result as often as possible! There is a risk that you will round the edge when working freehand! Next, grind the flat back (mirror side). Repeat the process with a finer stone, between grit 3000 and grit 6000. With a wide sharpening aid, it is of course much easier! If you are not sharpening the standard carbon steel blade but a thicker blade that does not bend, you should round the edges of the cutting edge. This prevents grooves in the workpiece. You can of course also do this with a thin blade, but it is not necessary. If the thin blade is bent in the pull plane, the edges do not come into contact with the wood surface. You can round it off with a few strokes of the file. Then use the sharpening stones to make the rounding as fine as possible.
Set iron
Use a drawknife to create a burr as shown in the image on the left. The iron should be securely clamped in a vise. Go over the entire length of the edge with the drawknife 3 or 4 times, always keeping it at the same angle - clearly above 15°. Now lift the handle of the drawknife a little and make another 3 to 4 strokes as described. For the last pass, do it at exactly 15° measured from the horizontal - as many strokes as necessary, usually also 3 or 4. At the beginning, you should hold a wedge at 15° or use a protractor until you get a feel for the correct angle.
Note: Before raising the burr, take a bit of grease with your fingertip from the nose area or from behind the ear (yes, there is a natural source of grease) and carefully apply it to the iron in the area of the planned burr. The drawknife will then run more smoothly.
Note on the Cutting Iron: DO NOT grind the back (mirror side)! This will only destroy the tips that do the cutting! Only grind the 45° bevel.

Bending iron
Care
Related products
 VERITAS")
Available, delivery time: 1-3 businessdays within Germany