Veritas Mortise Chisel - User Manual
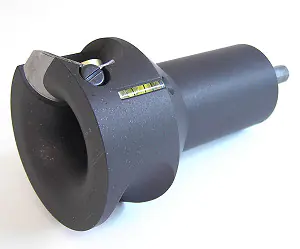
For anyone who enjoys making rustic furniture or furniture from wild wood, this massive dowel cutter made of aluminum from Veritas cuts clean round dowels with a rounded base. These dowel cutters are designed to work vibration-free with a drill. A built-in level allows you to maintain perfect horizontal alignment while cutting. The blade is adjustable, so the diameter of the dowel can be precisely set. The blade can be easily sharpened with the help of the built-in sharpening aid. However, you can also use these dowel cutters with a hand drill.
The Veritas dowel cutters are designed for hand drills and should never be used in a bench or pillar drill. Reasons:
- The workpiece must be precisely clamped in the axis of the drill chuck. Any small deviation creates a high imbalance on the dowel cutter, which can damage its shaft.
- You have no feel for how well or poorly the dowel cutter is working on the bench drill. There is a risk that it will be overstrained without you noticing. This can lead to damage to the shaft.
- Excessive strain at high speed can lead to overheating of the carbon steel blade, causing it to lose its hardness.
Traditionally, sharpened scrapers are brought to the workpiece at a negative angle (as shown on the left) to allow the burr to engage with the wood. However, this can lead to a severe unwanted digging into the wood.
A scraper sharpened with the Veritas burr scraper should initially be presented to the workpiece at a slightly positive angle, so that the burr does not cut yet. The scraper is then slowly and carefully lifted until the burr begins to cut (as shown on the right). A well-sharpened scraper produces long and even shavings.
When turning, no greater pressure should be applied; the cut is self-regulating. Attempting to apply too much pressure will only result in chatter marks, providing no advantage. If you want to remove more material, it is better to use a larger burr.
If, after some time, only dust is produced instead of shavings, it is time to sharpen again.
Test cut
- Read the operating instructions! Learn about the applications and limitations of the tool, as well as the dangers it may pose.
- Do not turn off your common sense. If an application seems unsafe to you, it probably is.
- Wear appropriate eye and/or ear protection. Regular glasses do not have safety glass. If dust is generated during work, use a dust mask. Workshop visitors should wear the same protection as the tool user.
- Wear suitable, close-fitting clothing. Clothing with loose sleeves is not suitable. Do not wear loose gloves, ties, or jewelry while working, as these can be caught by a rotating tool.
- Long hair should be tied back.
- Do not work under the influence of alcohol, drugs, medication, or when you are fatigued.
- Ensure a suitable environment for your work. Electric tools should only be used in dry, clean, and well-lit environments, and never near flammable liquids or gases.
- Observe the regulations for electrical installations in your country.
- Protect the cable of your electric machine from heat, oil, or sharp edges.
- Never carry a plugged-in electric tool with your finger on the switch.
- Never carry an electric tool by the cable.
- Always use the appropriate tool. Never use a small machine or tool for heavy and large tasks for which it is not suitable.
- Do not force the tool. Less pressure is often better.
- Do not use damaged tools. They can be dangerous.
- Repairs and maintenance should only be performed by an authorized service provider using original spare parts.
- Do not modify the tool. If you notice abnormal behavior during use, stop working.
- Keep your tool in good condition. Keep your tool sharp, clean, and oiled where necessary. Sharp edges have less risk of kickback and are less likely to burn the workpiece surface. They cut faster, cleaner, and safer than dull edges.
- Keep hands away from the rotating tool.
- Unplug the tool before changing or adjusting it or when cleaning the machine.
- Handle tools with sharp edges carefully.
- Always insert the shank of a tool as deep as possible into the holder to ensure a secure grip. Tighten the tool well.
- Remove all nails from the workpiece before working on it.
- Always secure the workpiece tightly in a vice or other suitable holding device.
- Before starting work, ensure that all settings have been made correctly.
- Remove wrenches or chuck keys before starting work.
- Never remove a workpiece or sections from a running machine.
- Only turn away from the machine once it has come to a complete stop.
- Electric tools should be stored dry and locked away, so they are out of reach of children.
Blade adjustment
Clamp the dowel cutter into a drill. For the large dowel cutters (1-1/4 to 2 inch), you need a chuck with a 13 mm capacity, for the smaller dowel cutters (5/8 to 1 inch), a chuck with a 10 mm capacity is sufficient. Pay attention to high torque and low speed, about 500 revolutions per minute.
Clamp a piece of wood horizontally in a vise at about waist height. The piece of wood should not be larger than specified in the table for the respective dowel cutter size. The end must be cut square. A small bevel on the four edges of the end makes it easier to start the dowel cutter.
| Maximum wood diameter of the raw material for dowel cutter diameter | |
|---|---|
| Dowel diameter (final product) |
Max. diameter of the wood (raw material) |
| 5/8 to 1 inch (15.9 to 25.4 mm) | = dowel diameter plus 1-1/8 inch (28 mm) |
| 1-1/4 to 2 inch (31.8 to 50.8 mm) | = dowel diameter plus 1-1/2 inch (38 mm) |
Note: If you do not have a vise, you can also secure the workpiece on a flat workbench with clamps.
Position the drill with the dowel cutter on the workpiece and align it in height using the built-in level. Then align the drill to the left and right by eye, so that it is exactly in line with the workpiece.
It is important to recognize that this dowel cutter cuts the dowels exactly in the axis of the drill. If you want off-center or angled dowels, clamp the workpiece at an angle accordingly.
Note: No matter what type of dowel you are making: always keep the drill stable in the same direction during a cutting pass. Do not shake!
Once you have aligned the drill with the clamped dowel cutter, turn it on. For the smaller dowel cutters 5/8 to 1 inch, the speed should be about 500 - 700 rpm, for the larger 1-1/4 to 2 inch about 100 to 200 rpm. If the machine runs too fast, there is a high risk that the dowel will not be straight. During rotation, long and even shavings should come out. If no shavings come out, the blade needs to be adjusted.
Setting the tenon diameter:

Image 1: Blade Adjustment
To adjust the blade, loosen the clamping screw by half a turn. To decrease the tenon diameter, push the blade forward. To increase the tenon diameter, turn the adjustment screw back slightly and pull the blade back to the head of the adjustment screw (Image 1). Then tighten the clamping screw again. Repeat the process as often as necessary until you are continuously producing shavings and the desired tenon diameter is achieved.
Translation of the English description in the image:
Blade Advance Screw: Adjustment Screw
Blade Clamping Screw: Clamping Screw
Clamping Washer: Washer
Note: Never turn the adjustment screw without first loosening the clamping screw. Otherwise, you may ruin this tool.
Setting the chip thickness:
Image 2: Inserted brass strip to increase the tenon.
In a few cases, the tenon may not fit tightly enough in the tenon hole, and you may want it to be a bit thicker, but the tenon cutter does not allow for this anymore. For this case, a 0.010 inch (0.25 mm) thick brass strip is included. Cut a 3 mm wide strip from it and insert it as shown between the blade and the body behind the clamping screw. This will make the tenon 0.5 mm thicker.
Translation of the English description in the image: 0.010" Shim 1/8" wide: Strip 0.25 mm thick and 3 mm wide
Note: Only one strip can be inserted. With two, the blade will not cut anymore.

Setting the tenon length
Image 3: Reducing chip thickness by inserting brass strips.
This dovetail cutter is designed for a chip removal of approximately 0.75 mm. In individual cases, a lower chip removal may be desired, for example, if the wood is dry or hard. Loosen the blade as described above and insert 3 - 6 mm wide strips of the supplied brass strip as shown in Image 3, then retighten the clamping screw. This reduces the chip thickness. You will take longer for one dovetail, but you can work with less torque and have better control.

Sharpening
Image 4: Depth adjustment
The smaller dowel cutters 5/8 to 1 inch cut dowels with a length of 70 mm, the larger ones 1-1/4 to 2 inch with a length of 108 mm. (The rounded base = rounded shoulder is not taken into account in the specified dimensions) The dowel length can be reduced by cutting off a piece of the manufactured dowel to the appropriate length. Drill a hole in one end of the cut dowel just deep enough for the supplied magnet to fit snugly and glue it firmly in the hole. Now slide the cut dowel with the magnet into the body (Image 4).
The body of the dovetail cutter has a lateral recess in the shape of the blade curve, which can be used as a sharpening aid. Remove the blade from the cutting position and tighten it with the clamping screw, as shown in image 5.
Note: For the larger dovetail cutters 1-14 to 2 inch, this clamping screw is mounted in the recess for sharpening. This additional clamping screw also has the function of holding a blade that has become very short due to repeated sharpening in the cutting position instead of the original screw with washer, to allow for better adjustment.
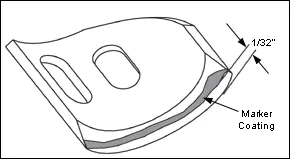
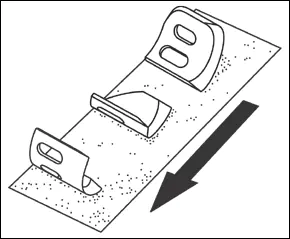
Now the blade can be sharpened on a bench drill with a mounted grinding cylinder (diameter 38 mm) (image 6). The rotation speed should be between 1000 to 2000 rpm. Important: apply little pressure and only hold it briefly, as otherwise the blade may lose its hardness due to overheating. It is advisable to mark the entire bevel with a waterproof felt-tip pen to better control the grinding success.
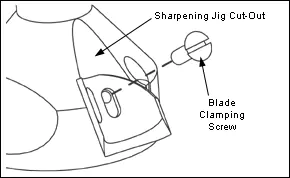
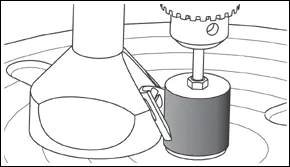
Image 6: Sharpening the knife.
We also offer the matching grinding cylinder with a diameter of 38 mm.
You can now closely observe where the marker's mark has disappeared. Grind until the entire bevel is free of the mark and all notches in the edge are gone. Also adjust the table height of the drill press in between to achieve even wear of the grinding cylinder.
If you have practice in sharpening, you can also sharpen by hand without a bench drill. This has the advantage that less material is removed and the risk of overheating is avoided. You can use a round wood with a diameter of 38 mm and cover it with waterproof sandpaper with a grain of 180 to 240. If you have the knife clamped in the sharpening aid as described above, fix the body at the edge of a flat surface and move the round stick covered with sandpaper vertically up and down. Make sure to keep the round stick vertical so that the entire bevel is captured by the sanding movements.
Image 7: Detail of the knife
Problems and their solutions
After you are done sanding, unscrew the blade. You will notice, upon touching with your finger, that a burr has formed on the side of the blade opposite the bevel. This burr must be removed. For this, you need either a flat (!) sharpening stone with at least 1000 grit or a corresponding fine sandpaper on a flat surface. Roll and pull the blade over the sharpening surface until the burr is gone (Image 8).
After sharpening, the blade is slightly shorter and needs to be readjusted. Proceed as described at the beginning.
Image 8: The removal of the burr.