January 31, 2025
Additional information
How to sharpen Japanese chisels?
Features of Japanese Chisels
Japanese chisels are made of laminated steel, with a hard layer for the cutting edge and a softer, more elastic layer as the base material. The mirror side is hollow ground to allow for easier honing. The blade is slightly angled, allowing for deeper holes to be chiseled than the short blade length might suggest. Due to the significantly higher hardness of the steel compared to what we are used to with European chisels, the edges are also somewhat more sensitive. Avoid prying and rough handling.
Traditionally, Japanese chisels (OIRE NOMI) leave the manufacturer's site neither sharpened nor with a firmly attached ferrule. It is up to the user to make the chisel usable and thus their own. In the meantime, manufacturers are willing to deliver the chisels reasonably sharpened, significantly reducing the initial effort.
Attaching the steel clamp
Gerd Fritsche recommends using a coarse diamond grinding plate for preliminary grinding, which can also be used to flatten the sharpening stones.
When grinding, the grinding aid is grasped at the front star grips and moved back and forth with strong pressure. To achieve a slightly convex edge, the pressure is applied slightly alternately on one side to the star grips.
Note: a slightly convex edge is only recommended for smoothing planes for fine finishing of surfaces. All other blades, such as smoothing plane blades and chisels, must have a straight edge!
When the plane blade is roughly ground to the desired angle and a burr has formed on the mirror side, switch to a 1000 grit water stone. Depending on personal grinding preference, a 800 or 1200 grit stone can also be used.
To give the blade the final edge, the set grinding angle is raised by about 1°. For this, you can carefully use the 1000 grit or even a 6000 grit stone.
With this measure, a micro bevel of about 1 mm width can be achieved very quickly.
Caution when changing stones: If the height of the stones used is not exactly the same, be sure to use the angle gauge again! Wash off dirt from the blade before changing stones!
Finally, hone on a 6000 or 8000 grit stone until the grinding burr has been removed.
Now the blade is ready for use.

Zwinge richtig befestigen
The steel ring, called a clamp, which holds the wooden handle together when striking the iron, is only loosely fitted. Slide the clamp on so that about 1 - 2 mm of the handle end is visible at the back. The clamp will usually be too tight; file or plane a little off the handle until you can slide it on. If it is only slightly too tight, you can also compress the wood with a hammer on the anvil.

Sharpening the iron
After the clamp has been placed over the end of the handle, you can tap it down a bit more with a hammer. Then, work on the edge of the handle end with a hammer so that it mushrooms over the clamp - thus securing it permanently. You make your work easier by soaking the handle end in water for several minutes after placing the clamp and only then working with the hammer. Some manufacturers have started to do this work at the factory, so you won't need to do it anymore.
You can confidently strike the OIRE NOMI with a iron hammer - this is customary in Japan! It is important that enough wood remains at the back so that steel does not strike against steel!

Under no circumstances use dry-running sharpening machines! Wet grinding machines are also only partially suitable for these chisels, as they create a hollow bevel - this weakens the edge. Japanese water stones are the most suitable!
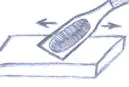
First, smooth the back side! This is absolutely necessary for new chisels! Lay the chisel flat on the grinding surface with the back side down (a completely flat sharpening stone or a steel plate sprinkled with silicon carbide powder wet!) and move the chisel on this surface until you notice material removal across the entire area of the edge. Do not grind too much from the back side, otherwise you will reduce the hollow grind too much, making later honing more difficult.
Subsequently, the bevel is ground on a water stone with a grit of 800 to 1200. The correct bevel angle is slightly blunter for Japanese tools than for European ones. Use about 30° for softwood; for hardwood processing, you can go even higher - up to 35°.
Fazit: Warum sich das richtige Schärfen lohnt
Wer japanische Stemmeisen korrekt mit Wassersteinen schärft und den passenden Fasenwinkel einhält, erhält eine außergewöhnlich präzise und langlebige Schneide. Der etwas höhere Aufwand zahlt sich in saubereren Schnitten, längerer Standzeit und besserer Kontrolle bei anspruchsvollen Holzverbindungen aus.