February 6, 2025
Instructions - how to use our Tools
User manual: Precision miter box
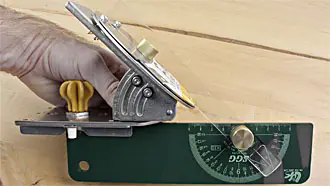
This Japanese miter box is infinitely adjustable in both angle and tilt. Therefore, it is suitable for miters, bevel cuts, and of course for simple right-angle cuts.
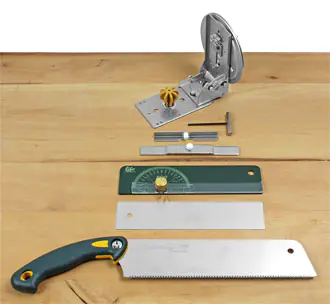
Scope of delivery (from top to bottom):
Uneven dowels: These occur due to unstable holding of the machine. Make sure not to wobble the machine back and forth, but try to maintain the direction. Reducing the speed helps with this. Also, ensure that the blade is always sharp.
Too small dowels: The blade is pushed too far forward. Move it back slightly and try again.
Too large dowels: This is most common with green wood. It gets slightly compressed when cut and then expands again. The blade should be pushed forward a bit. However, note that the dowel will shrink during drying anyway.
Dowels that look like they have threads: Too much pressure is being applied. Additionally, a spacer can be used to reduce the chip thickness.
This damage can also occur when retracting the tool after completing the dowel. This happens most often with green wood, as it is easily compressed a bit when cutting the dowel. Pull the dowel cutter back with the machine stationary or with a slight counterclockwise rotation.
Off-center dowels: If the fiber structure of the wood is accordingly, there is nothing you can do about it.
Half dowels: If the dowel cutter suddenly stops cutting in the middle, the blade needs to be pushed forward slightly.
Adjustment examples
1. Base unit with turntable and handle
2. Allen key
3. Side stop
4. Stop for longer cuts
5. Angle gauge
6. Setting gauge
7. Hand saw
2. Allen key
3. Side stop
4. Stop for longer cuts
5. Angle gauge
6. Setting gauge
7. Hand saw
Setting 90°
Alle Einstellungen können nach dem Lösen der entsprechenden Innensechskantschraube vorgenommen werden.
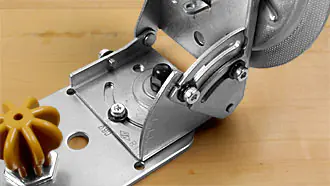
Setting 45° for miter cuts
All settings can be made after loosening the corresponding hexagon socket screw.
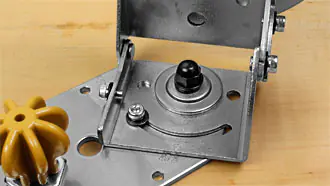
Setting 45° for bevel cuts left
The angle can be adjusted continuously without steps.
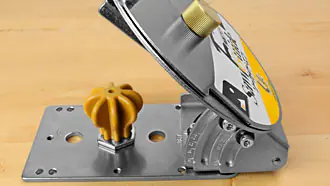
Setting 45° for bevel cuts right
The angle can be adjusted continuously without steps.
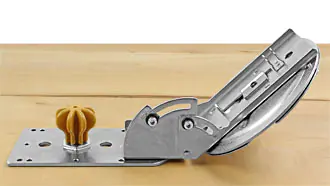
Setting 45° for bevel cut
The angle can be adjusted continuously without steps.
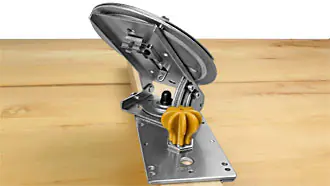
Sawing with the miter box
The angle can be adjusted continuously without steps.
90° setting with saw
Rechtshänderanwendung
Ziehen Sie nach jeder Änderung der Einstellungen die Schrauben mit dem Winkelschlüssel fest. Dann führen Sie das Sägeblatt in den Schlitz der Sägeführung ein. Achten Sie darauf, dass die Zähne des Sägeblattes mehrere Millimeter von der Sägeführung entfernt bleiben. Die Höhe der Sägeführung kann mittels der zentralen Einstellschraube aus Messing justiert werden.
Halten Sie beim Sägen die Sägeführung stets mit einer Hand fest und drücken Sie sie an die Werkstückkante.
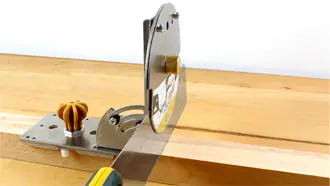
90° setting with saw
Right-hand application
After each adjustment of the settings, tighten the screws with the wrench. Then insert the saw blade into the slot of the saw guide. Ensure that the teeth of the saw blade remain several millimeters away from the saw guide. The height of the saw guide can be adjusted using the central brass adjustment screw.
When sawing, always hold the saw guide with one hand and press it against the edge of the workpiece.
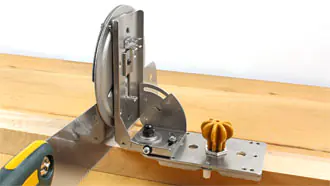
Setting 45° miter cut with saw
Left-handed application
If you are left-handed, simply turn the saw guide around and attach the side stop on the other side. This applies to all settings of this saw guide.
If you are left-handed, simply turn the saw guide around and attach the side stop on the other side. This applies to all settings of this saw guide.
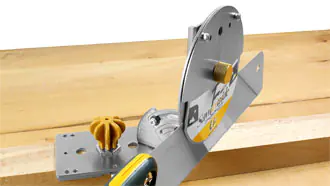
Setting 45° bevel cut with saw
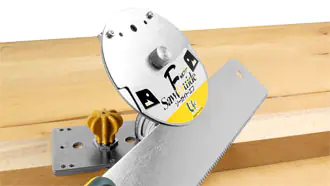
For sawing wide workpieces,
entfernen Sie den Seitenanschlag. Montieren Sie den Parallelanschlag wie abgebildet. Führen Sie die Sägeführung während des Sägens an der Führungsleiste entlang.
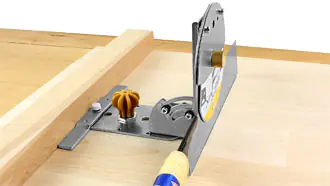
Mitre cuts can also be made on wide workpieces.
Remove the side stop. Install the parallel stop as shown. Guide the saw along the guide rail while sawing.
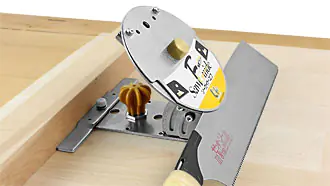
Use of the angle gauge
For checking the angle of miters
Benutzen Sie die Einstelllehre als Sägeblattdummy und legen den Winkelmesser, nachdem Sie die gewünschte Gehrung eingestellt haben, an Grundplatte und Seitenanschlag an. Abbildung: 45° Gehrungswinkel, es geht jeder gewünschte Winkel!
Die Benutzung des Winkelmessers ist zunächst etwas fummelig, aber nach einiger Übung hilft er Ihnen, Ihre Präzision erheblich zu verbessern.
Die Benutzung des Winkelmessers ist zunächst etwas fummelig, aber nach einiger Übung hilft er Ihnen, Ihre Präzision erheblich zu verbessern.
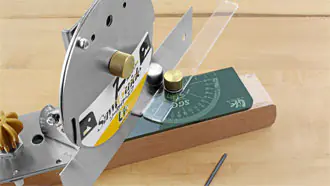
For checking the bevel angle
Use the setting gauge as a saw blade dummy and place the protractor against the base plate and side stop after you have set the desired miter. Illustration: 45° miter angle, any desired angle is possible!
Using the protractor is initially a bit fiddly, but after some practice, it will help you significantly improve your precision.
Using the protractor is initially a bit fiddly, but after some practice, it will help you significantly improve your precision.
